
How to Draw Realistic Animal Eyes
One of the first things people notice in a wildlife portrait is the eyes.
You can have beautifully drawn fur, perfect proportions and wonderful shading, but if the eyes don’t look right, the whole artwork can feel flat and lifeless.
The good news is that realistic eyes aren’t as difficult as they may seem. By paying attention to a few key details, you can create eyes that sparkle with life and become the focal point of your wildlife artwork.
Why Eyes Matter So Much
The eyes are often called the “window to the soul,” and this is especially true in wildlife art.
Whether you’re drawing a curious koala, a majestic eagle or a playful puppy, the eyes create an emotional connection between the viewer and the animal.
Well-drawn eyes can make a portrait feel alive and engaging, while poorly observed eyes can make even the most technically skilled artwork seem unrealistic.
When working on a wildlife portrait, I often encourage students to spend extra time on the eyes. A little patience here can transform the entire drawing.
Start With Careful Observation
Before putting pencil to paper, spend a few minutes studying your reference photo.
Ask yourself:
- Where is the light source coming from?
- Where are the brightest highlights?
- What shape is the pupil?
- Are there reflections in the eye?
- Which areas are darkest?
Many beginners focus only on the colour of the eye, but it’s the values—the lights and darks—that create realism.
The more closely you observe, the more convincing your final artwork will be.
Look for Reflections
One of the secrets to creating realistic animal eyes is paying attention to reflections.
Most eyes reflect their surroundings.
You may see reflections of the sky, trees, grass or even the photographer.
These reflections create depth and make the eye appear glossy and alive.
You don’t need to draw every detail of the reflection. Simply suggesting the major shapes and tones is often enough to create the illusion.
Don’t Forget the Catchlight
The catchlight is the small bright highlight created by a light source reflecting in the eye.
This tiny detail is often what makes an eye appear alive.
Without a catchlight, the eye can look dull or flat.
Look carefully at your reference photo and identify exactly where the brightest highlight appears.
Keep this area clean and bright throughout your drawing process.
Many artists accidentally lose the catchlight while layering colour or shading, so it’s worth protecting from the beginning.
Build the Dark Values
Realistic eyes often contain some of the darkest values in a wildlife portrait.
The pupil is usually very dark, but you’ll also find deep shadows around the eyelids and within the iris.
Many beginners don’t make these areas dark enough.
Strong darks help create contrast and make the highlights appear brighter.
Rather than pressing heavily straight away, gradually build your dark values in layers. This gives you greater control and often produces a richer result.
Pay Attention to the Surrounding Area
The eye itself is only part of the story.
The eyelids, lashes, surrounding fur and shadows all contribute to realism.
Observe how the fur changes direction around the eye.
Notice where shadows fall beneath the eyelids.
Look for subtle colour variations in the skin or feathers surrounding the eye.
These details help the eye sit naturally within the portrait rather than appearing pasted onto the animal’s face.
Avoid Heavy Outlines
One common beginner mistake is outlining the entire eye with a dark line.
In reality, most eyes don’t have a visible outline all the way around.
Instead, edges are often created by changes in value and colour.
Try looking for soft transitions and subtle shadows rather than relying on strong outlines.
This creates a more natural and realistic appearance.
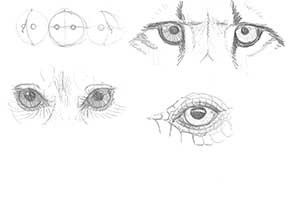
Practice With Different Animals
Every animal species has unique eye characteristics.
Birds often have sharp highlights and striking colours.
Dogs and cats tend to have softer reflections and complex iris patterns.
Reptiles may have unusual pupil shapes and highly reflective surfaces.
The more animals you study, the more your observation skills will improve.
You’ll begin to recognise common patterns while learning how each species differs.
Take Your Time
Eyes are usually one of the smallest areas of a wildlife portrait, but they often deserve the most attention.
Slow down and enjoy the process.
Carefully observe the shapes, values and reflections.
Work gradually and build your layers patiently.
The extra effort will be rewarded with eyes that sparkle with life and draw viewers into your artwork.
Bringing Your Wildlife Portraits to Life
Realistic animal eyes aren’t about artistic talent—they’re about observation.
By paying attention to highlights, reflections, dark values and surrounding details, you can create eyes that look alive and expressive.
The next time you begin a wildlife portrait, spend a little extra time studying the eyes.
You may be amazed at how much difference this one area can make to the overall realism of your artwork.
Happy drawing!